LogonStudio is a software app that was developed by Stardock. This application is similar to the BootSkin application, discussed previously, in that it does not modify the system files. Although this method is very simple to use, the Welcome screens must be designed to work with LogonStudio. This is not a big deal, because there are hundreds of Welcome screens that people already made for this program, but users will find that they will not be able to use any of the thousands of Welcome screens made from hacked system files. Depending on what Welcome screen you like, you may or may not be able to use it with this program.
Although you have to give up a little flexibility in the screens that you can use, you will have added safety and ease of use. Because you will not be working with hacked system files, you don’t have to worry about getting the correct version and the possible problems that running an older version could cause. Also, using LogonStudio is very easy. You can change your Welcome screen with just a few clicks.
To get started, you will need to download a copy of LogonStudio at Stardock’s Web site: www.stardock.com/products/logonstudio/download.html. Once you have the app downloaded and installed, most likely you will want to download a cool Welcome screen to use with it. You can download hundreds of Welcome screens from the following sites:
WinCustomize: www.wincustomize.com/skins.asp?library=26
SkinPlanet : www.skinplant.com/library.cfm?lib=5
DeviantArt : www.skins.deviantart.com/windows/xplogon/
Skinbase: www.skinbase.org/section.php?sections=logonstudio
Once you have downloaded a few screens, you can install them by just double-clicking them if they have a .logonxp file extension, which will open them up. If the files that you download do not have a .logonxp file extension and instead just have a .zip file extension, rename the files to .logonxp so that you can easily import them into LogonStudio. LogonStudio will then be started automatically and will display the new Welcome screen in the preview box, as shown in Figure 1-12, when the files are double-clicked.
If for some reason the Welcome screen that you download does not have a .logonxp file extension, and is just a .zip file with a folder containing several bitmap image and configuration files, you can still install the Welcome screen. If you have a Welcome screen that fits that description, then you will just have to manually copy the folder with the Welcome screen files to the LogonStudio folder that is normally located at C:\ProgramFiles\WinCustomize\ LogonStudio.

FIGURE 1-12: LogonStudio showing new Welcome screen installed
When you browse to the LogonStudio folder, you will notice that each Welcome screen has its own folder with the files for the Welcome screen inside. If you ever want to delete a Welcome screen, just delete the folder with the corresponding name.
Changing the Welcome screen with LogonStudio is very easy to do. Just click the name of the screen from the available logons list. A preview will show up in the preview box, and if you like it, click Apply or OK and you are finished.
Depending on your computer setup, you may experience problems when using some Welcome screens with monitors that are set at a large resolution. If you experience a problem like this with a specific Welcome screen, you are out of luck. Try finding a different version of the Welcome screen that was made for higher resolutions. This can be very difficult because resolution data is usually not posted with the Welcome screens.
If you ever want to revert to the original system Welcome screen, just click the Restore Default XP Logon button and it will uninstall the LogonStudio app and prevent it from taking over the Welcome screen. You will also have to do this if you are using LogonStudio to display a Welcome screen and then want to use a hacked system file Welcome screen. First, you will have to start up
LogonStudio and click the Restore Default button, and then you can edit the registry to point to the new Welcome screen. If you do not click the Restore button in LogonStudio, then you will never see your new hacked system file because LogonStudio will still be active and will automatically replace it.
Creating your own Welcome screen from a hacked system file
When users first started to change their Welcome screen, they used the same approach that was used with the boot screens. Resource-hacking tools such as Resource Hacker were used to replace the bitmaps that are stored inside the logonui.exe file. Then, they would adjust the string values within the file with the same tool to change the layout of the screen. Although there are now apps that were built to make Welcome screens easier, I still believe that the best way to create a Welcome screen by hacking your system file is to use Resource Hacker. I have had problems with other tools that attempt to automate the process of hacking the system file resources because the programs will usually only work with one version of the system file. If you have a newer system file than the program was designed to work with, then you won’t see the Welcome screen.
As I stated earlier, the best way to create a Welcome screen from a hacked system file is to do it manually using a cool app called Resource Hacker (www.users.on.net/johnson/ resourcehacker), written by Angus Johnson. This method will allow you the greatest amount of flexibility because you are not limited to the features of a Welcome screen editor.
Although this method is a little complex, it is the best way to create a high-quality and unique Welcome screen.
I am going to show you the basics of how to get started, but I am not going to go into great detail on all of the great things that you can do because there are just too many. Instead, at the end, I will tell you about some great Web sites that I use as references when I want to make a Welcome screen from scratch.
The first step is to make a copy of your logonui.exe file. This file can be found in the System32 directory inside the Windows directory. The exact path is usually C:\WINDOWS\system32. Copy the file to a new folder, maybe your Welcomescreen folder. Also, feel free to rename the file at this time. You can name it anything you want, because when you want to install it, you just have to enter the path and the file name in the registry as you did above when installing a custom hacked system file Welcome screen.
Next, you can start editing the bitmaps in the file. To do this, I recommend using Resource Hacker. You can download a copy of Resource Hacker by visiting www.users.on.net/johnson/resourcehacker. Once you get a copy up and running, open up the logonui file that you just copied. You can do this by clicking the file menu bar item and selecting the file from your drive.
Once the file loads in Resource Hacker, you will see an interface similar to Windows Explorer. You will have four folders: UIFILE, Bitmap, String Table, and Version Info. To get started, expand the Bitmap folder. You will then see several more folders that are numbered. Every numbered folder contains a different image. Expand the numbered folder for a preview of the image that is stored inside it.
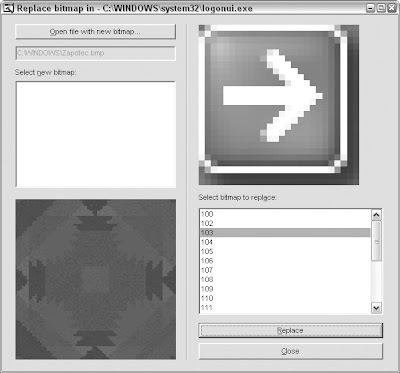

FIGURE 1-13: Using Resource Hacker to replace bitmaps in the logonui.exe Welcome screen file.
Now let’s assume that you want to extract one image out of Resource Hacker so that you can modify it using your favorite paint program and then replace the old image with your modified one. To extract an image, make sure that the image you want is selected and displayed in the preview pane and then click the Actions item from the menu and select Save [Bitmap : XXX : XXXX ], where the X’s are numbers. Once you have an image modified, or if you want to completely replace an existing image, click the Action menu bar item again. Select Replace Bitmap. This will bring up a new screen that will list all of the bitmaps in the file. Click the Open File With New Bitmap button and select the image you want to import. Make sure it is a Windows Bitmap file, as JPEGs and GIFs will not work! Next, scroll through the list, as shown in Figure 1-13, and select the image that you want to replace. Click the Replace button and you are finished.
Once you get all of the bitmap images swapped out with ones you made yourself, you can move on to editing some of the strings in the string table folder. This is where all of the font names and text that appear on the Welcome screen is stored. You can edit the text just like using a text editor. Just be careful that you do not accidentally delete a quote from the ends of the strings. Also, do not change the index numbers or you will run into problems. Once you are finished editing a specific string table, just click the Compile script button and you are finished with the strings.
The next part allows you to be really creative but it also can be really complex. The UIFILE folder stores all of the detailed configuration information for the screen. Items such as transparency levels and font sizes are stored here. When you first view the UIFILE 1033 resource, you may not see anything at all. Just scroll down and you will begin to see the script. Just like the string table, when you are finished editing it, click the Compile Script button.
The last step is to save your changes to the file by clicking the File menu bar item again and just click Save. Now, you can edit the registry to test out your new screen.
It will probably take you a little while to finally get the screen the way you want it. One site that I use as a reference is called Windows XP Logon Screen Secrets, written by Paul Andrews, which is located at webpages.charter.net/joolsie/LogonScreens.htm. This is a great site that will tell you all of the details on how to modify the UIFILE so that you can get the most out of your Welcome screen.
Creating a Welcome screen with LogonStudio
LogonStudio is not only a great program to change your Welcome screen with, but it also is a good program to create it with too. If you do not want to waste a few hours manually perfecting your Welcome screen and do not desire the flexibility the manual approach offers, then using LogonStudio is the app for you.
Creating a Welcome screen with LogonStudio is very simple. Also, you can easily edit welcome screens that you downloaded by clicking the Edit button from within LogonStudio when you have selected a screen. However, some of the screens will not be able to be edited because significant changes have been made to Logon Studio recently that make some of the earlier Welcome screens incompatible with the editor.
To create a new Welcome screen from scratch, follow these steps:
First, if LogonStudio is not already started, start it up from the Start menu’s All Programs menu in the WinCustomize folder. Once it is started, click the New button, as shown in Figure 1-14. This will bring up a new window that will ask you for details on the new Welcome screen, such as the name and the author’s information. Fill it out, and then click the Create button.
Next, the editor will show up and you will see what looks like the default Windows XP Welcome screen. The best way to get started is to just start playing around with different features. When working in the editor, there are two different ways to select an item to work on. You can just click most items, but if you want to get to an item faster, or an item that you cannot click, use the Elements browser. Using the editor is a lot like
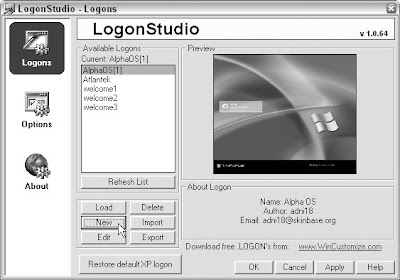

FIGURE 1-14: Using LogonStudio to create a new Welcome screen
programming in Microsoft’s Visual Basic. When you click an element, you will see a list of properties appear in the Properties browser.
For example, let’s assume that you want to change the background color. To do this, you can click the blue background, or you can select the Center Panel from the Elements browser. Once the Center Panel is selected, you will see several properties appear in the property browser. The ones that you will be interested in working with to change the background color are Firstcolor and Lastcolor. To change the color, just click the color boxes in the Property browser and select a new color, as shown in Figure 1-15.
Working with images is also very easy with the editor. If you want to set a photo or an image you made as the background for the Welcome screen, you can just select the [Bitmap] property of the picture properties item from the Center Panel element browser. Once you select your bitmap and it is displayed, you may want to change how it is displayed such as if it is a pattern and you want it titled or if you want it stretched across the screen. To do that, just click the Style properties drop-down box and select the style you want.
Replacing the images for the different buttons is also very easy. Just use your mouse to select the image that you want to change, and then one property, called [Bitmap], will appear in the Properties browser. Just click the three dotted icon in the Properties browser. A new dialog box will pop up, giving you the option to edit or browse. If you click Edit, the image will open up in MS Paint for you to edit it. If you already have a new image that you want to use, then just click Browse and select the replacement
 FIGURE 1-15: LogonStudio Editor showing how to change the color.
When you are creating graphics for your Welcome screen and want parts of the image to be transparent, such as the background around a button you made, just paint the background with the light pink color (Red: 255, Green: 0, Blue: 255). This is the default color for transparency in Windows.
You will not always want some elements in the Welcome screen. For example, you probably won’t want the dividers that appear in the center of the screen and the dividers at the top and bottom sections. These dividers are just images. One easy way to get rid of them is to click the center divider line to bring up the Dividers property browser, then just click the three dotted icons and uncheck the Use Picture box when the dialog box pops up.
Editing the text of the Welcome screen is just like editing the text in any word processing program. Just click the text, and you will see all of the properties in the Property browser for the font, size, and color. You can even change what the text says by modifying the Caption property.
The area that displays the users account, known as the User Account element, may take the most time to get it looking the way you want. Dozens of different properties are in this area, one of which specifies the location of the user’s accounts on the Welcome screen. This property is called the Account property. It shows a number that signifies a region on the screen. Click the button to the right of the number and you will get a visual map of the different locations. Select a location by clicking it. Another type of property in this section is the Alpha properties, which has three subproperties. These have to do with how visible the accounts are at different stages. 0 is not visible at all and 255 is completely visible. The Alpha Mouse subproperty is used to adjust the Alpha levels when the mouse is hovering over the name block. Alpha Selected is when the user has clicked the name and Alpha Normal is when the name has not been selected and the mouse is not hovering over it. BackColor is the name of another property in the section as well, which sets the background color for the account. When using this part of the editor, I discovered a small bug in the preview window. For some reason, the preview does not show the back color of the user’s account. Instead, it just displays the blue gradation bitmap from the default Welcome screen. Don’t worry too much about this bug, because it is only in the preview screen and will not affect your Welcome screen when it is in use. Once you change the color, the color change is saved, just not displayed.
You now know about all of the different parts of the editor and the basics of how to make a good-looking Welcome screen. Once you are finished, click the Save button (the two disks) and you are finished. If you want to save and view the Welcome screen at the same time, click the Logon menu bar item and select Save and Apply.
You now know the ins and outs of creating your own Welcome screen using LogonStudio. I personally use the method to create and manage my Welcome screens. It is just easier than using the resource hacker and I can live without the added flexibility that the resource hacker provides.
LogonStudio also has a feature that allows you to import hacked system file Welcome screens that you used in the first section on changing the Welcome screen. Although this feature makes it a little easier to convert the Welcome screen to the new format by extracting the images, usually the layout and all of the strings are messed up and require adjustment. If you have a lot of free time, try experimenting with this feature. I have not yet been able to get it to work 100 percent of the time.
Working with the classic logon screen
The classic logon screen, also known as the Windows 2000 style screen, has many benefits over the new Welcome screen for some users. Users that are concerned about the security of their system often do not want a list of all of the user’s accounts to be displayed when they turn on the computer.
In corporate environments, the classic logon screen provides the capability to log into domains (Windows network security servers), although the Welcome screen does not have this capability. Additionally, some people just do not like change that much and they do not like the new welcome screen. Also, if you are a minimalist and like to keep things simple and uncluttered, you may like the classic logon screen better because it is very simple and only takes up a small amount of your screen.
This next section is dedicated to showing you how to turn on the classic logon screen as well as customize it a bit.
Switching to classic logon
The classic logon can always be reached on the Welcome screen by pressing Ctrl Alt Delete two times. If you want to completely get rid of the Welcome screen, doing so is very simple. Before you disable the Welcome screen, you should also be aware that doing so will disable Fast User Switching. Fast User Switching gives you the ability to switch between accounts on your computer without having to log out of one account to log on to another. Most users never use this feature, so having it disabled will not change anything. Follow these steps to kill the new Welcome screen:
Click the Start menu and select Run. Then type nusrmgr.cpl in the box and click OK. This will start up the User Accounts control panel applet.
Once you see the User Accounts app, click Change The Way Users Log On Or Off. Then, uncheck the box next to Use The Welcome Screen, as shown in Figure 1-16, and click Apply Options.
Now, you will no longer see the Welcome screen. If you ever want to use the Welcome screen again, just go back into the User Accounts control panel applet and check the box for the Use The Welcome Screen.
Now that you have the classic logon screen activated, there are a few things that you can do to make it look a little better and unique.
Changing the logon screen background color as well as the visual style and color scheme of the logon screen are all examples of ways you can hack the classic logon screen to make it unique.
Changing the Logon Background
Ever want to change the background color of the classic logon screen from light blue to some new color? Windows makes this difficult, because there are no options anywhere in graphical user interfaces of Windows to change it. However, with the help of the Registry Editor, you can easily change the color of the logon screen. To get started, follow these steps:
First, you will want to start up the Registry Editor by clicking the Start menu and selecting Run. Then type regedit in the box and click OK.
Once the Registry Editor starts up, you will want to expand HKEY_USERS, DEFAULT, Control Panel, and then Colors.

FIGURE 1-16: Disabling the Welcome screen using the User Accounts Control Panel applet.
Once you have expanded the Colors key, you will see all of the different default user settings. These are all of the settings that are used on the logon screen. The entry that you will be interested in is called Background. You will notice that the background entry has a value that contains three different numbers. Each of these numbers represents a different color makeup in the RGB color format. The first number is red, the second is green, and the third is blue. The numbers can range from 0 to 255. A RGB Value of “255 255 255” is white; “0 0 0” is black. Changing the color is not as simple as replacing the numbers with the word red; first you have to convert the color that you want to use to the correct RGB numbers.
An easy way to convert a color to a RGB number value is to use Microsoft Paint, which can be found in the Start menu under Accessories. Once you have Paint up and running, double-click one of the colors in the color palette; this will bring up the Edit Colors window. Next, click the Define Custom Colors button. This will expand the window and will show you the Red, Green, and Blue values for any color you select. Click the boxes in the Basic Colors section to see their RGB values or if you do not see a color you like, use your mouse to click around on the color image to the right to get a custom color. Once you have found a color you like, just write down the number of Red, Green, and Blue. These values can be found in the lower-right corner of the screen.

FIGURE 1-17: Changing the background color of the logon screen with the system Registry Editor
When you have found the color that you want to use as the background and have also converted it to the Red, Green, and Blue format, you are ready to edit the entry. Right click the entry, as shown in Figure 1-17, and select Modify.
In the Edit String box, replace the numbers so that the first number is the number of red, followed by a space. Then, repeat that format for the other two colors so that your entry looks something like this entry for orange, “255 128 0”. Click OK when you are finished to save the change.
Once you change the color, the next time you reboot and the classic logon screen is displayed,you will see your new background color.
If you ever want to revert your computer back to the default blue color, repeat the steps above to change the color and set the value of the background entry to “0 78 152”.
Setting a background image for the logon screen
If you do not want to change the color of the screen, perhaps you have an image that you would like to set as the background to appear behind the logon window. Once again, the only way to set this is to use the Registry Editor to hack the default user settings which are displayed on the logon screen. To get started, follow these steps:
Click the Start menu and select Run. Then type regedit in the box and click OK. This will start up the Registry Editor.
Once the Registry Editor has loaded, you will want to expand HKEY_USERS, DEFAULT, Control Panel, and the Desktop key. Next, you should see all of the different entries for desktop properties. The entries that you will be interested in are Wallpaper and WallpaperStyle.
Right-click the Wallpaper entry and select Modify. Then type in the full path to the image that you want to use on your computer. Let’s assume that you want to set the nice grassy hills photo as your background. This file is located at C:\WINDOWS\Web\ Wallpaper. The name of the file is bliss.bmp. Therefore, the full path of the image file is C:\WINDOWS\Web\Wallpaper\bliss.bmp.
Once you have the path to the file set, you can click the OK button to save the change. Now you can change the WallpaperStyle entry if you want to change how the wall paper will be displayed. You have three different options: 0 centered, 1 tiled, 2 stretched to full screen. If you want to change the way it is displayed, just right-click the WallpaperStyle entry and select Modify, then enter the corresponding number value for the style you want to use. Click OK to save, and you are finished!
Now you have worked with customizing the look of the background, let’s move on to changing the way the sign-in box looks.
Changing the visual style and color scheme
Changing the visual style and color scheme can greatly increase the visual appeal of the classic logon screen. Instead of using the default blue Windows XP style on the screen, you can specify any style that is installed on your computer as well as the different color schemes that some styles have. This hack works great in combination with setting a background image. You can create a nice clean look that still looks good without using the Welcome screen.
To get started, you will be using the Registry Editor again. Also, before you can change the visual style, you should be aware that you will need to apply a patch to your system so that you can run Visual styles that other people have made for Windows XP. More on this will come in future posts, where you will find out where to get Visual styles from and how to install them. Just be aware that you will not be able to change the visual style of the classic logon window until you have read those things. So be patient for that. If you attempt to change it now, on an unpatched system, you will run into problems. However, if you just want to change the color scheme of the default Windows XP style, then you will have no problems right now at all. Now that I have warned you about the possible problems you may encounter, let’s get started:
Click the Start menu and select Run. Then type regedit in the box and click OK.
Once the Registry Editor is open, navigate through HKEY_USERS, .DEFAULT, Software, Microsoft, Windows, CurrentVersion, and ThemeManager. You will now see all of the theme properties for the logon screen. The two entries that you will be working with are ColorName and DllName. ColorName specifies the color scheme of the current visual style that is specified in the DllName property.
First, let’s change the color scheme of the default Windows XP style. You have three different choices for the ColorName value: NormalColor (default blue look), Metallic(silver), Homestead (olive green look). To change this property, just right-click it and select Modify. Then change the value to the corresponding value for the color scheme you want to use, such as Homestead, as shown in Figure 1-18. For example, if you want to use the olive green look on the classic logon screen, you will want to set the ColorName value to Homestead.
 FIGURE 1-18: Modifying the color scheme of the default Windows XP visual style with the Once you reboot or log out, you will see the changes that you made.
If you are having display problems after you install a new visual style, make sure that you have properly patched your computer. Remember, you have to patch your computer, not just install a program like Style XP.


No comments:
Post a Comment